E11 | Shed Foundation, Bifold Doors | Ask This Old House
Season 23 Episode 11 | 23m 42sVideo has Closed Captions
Mark installs a shed base; Tom and Nathan talk framing; Nathan installs bifold doors.
Mark McCullough travels to Detroit to help a homeowner make a gravel foundation for a shed; Tom Silva and Nathan Gilbert walk through the anatomy of framing an interior non-load bearing wall with a door opening and share their tips on how to build one; then Nathan helps a homeowner hide their laundry area by installing a partition wall with bifold double doors.
Problems playing video? | Closed Captioning Feedback
Problems playing video? | Closed Captioning Feedback
Funding for THIS OLD HOUSE is provided by The Home Depot.
Support provided by:

E11 | Shed Foundation, Bifold Doors | Ask This Old House
Season 23 Episode 11 | 23m 42sVideo has Closed Captions
Mark McCullough travels to Detroit to help a homeowner make a gravel foundation for a shed; Tom Silva and Nathan Gilbert walk through the anatomy of framing an interior non-load bearing wall with a door opening and share their tips on how to build one; then Nathan helps a homeowner hide their laundry area by installing a partition wall with bifold double doors.
Problems playing video? | Closed Captioning Feedback
How to Watch Ask This Old House
Ask This Old House is available to stream on pbs.org and the free PBS App, available on iPhone, Apple TV, Android TV, Android smartphones, Amazon Fire TV, Amazon Fire Tablet, Roku, Samsung Smart TV, and Vizio.
Keep Exploring


This Old House Insider Newsletter
Get This Old House exclusive stories, tips, and behind-the-scenes information delivered right to your inbox every month.Providing Support for PBS.org
Learn Moreabout PBS online sponsorship♪♪ Kevin: On "Ask This Old House," our experts travel across the country to answer questions about your house.
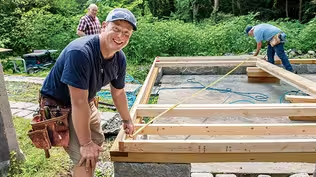
♪♪ Today, Mark heads to Detroit to help a family build a foundation in preparation for a shed delivery.
Brent: This is a good team we got right here.
Mark: Yeah.
Kevin: And Tom and Nathan give a primer on framing 101.
Tom: It's gonna give you a straight line across the floor.
Kevin: Then Nathan installs a new bifold door on "Ask This Old House."
♪♪ Cornetta: Welcome back to Detroit, Mark.
Mark: Alright, well, thank you, Cornetta.
The last time I was here was 2016.
They were rejuvenating the city.
They've done a great job.
I happen to love the brick.
It is beautiful, house to house.
I mean, I'm speechless really, but I know you're involved in a great little project yourself.
Cornetta: That's right.
Yeah.
So I'm a part of the Michigan Central team, and we just fully restored the historic train station.
And, you know, as a kid growing up, I grew up right up the street from it.
And I thought to myself, "I wish the adults would fix this place up."
And now to be an adult and be a part of the team that's bringing it back to life, it feels like a full-circle moment.
Mark: That's great.
Well, I love it, but that's not what you wrote me about.
I think you wrote me about the shed.
-Cornetta: That is correct.
-Mark: Yes.
Cornetta: So we purchased this house in 2020 and it didn't have a garage.
And we have so many things to store.
And having you here today to help us build out a shed, I'm really excited about it.
Mark: Alright.
Well, I can't wait.
Why don't we go out back and check the site out?
-Cornetta: Let's do it.
-Mark: Alright.
Before the shed can be installed, Cornetta and I are going to build the base where it'll sit.
She's already done some prep work by having the space cleaned out.
-Cornetta: Here we are, Mark.
-Mark: Alright.
Great space.
Cornetta: And as you can see, look at all these tools.
-Mark: They need a home.
-Cornetta: They need a home.
Mark: Alright.
And, Cornetta, I'm looking at the space, I think?
Right?
-Cornetta: Yes.
And so we're gonna build an 8x6 shed right here.
Mark: Okay.
So for an 8x6 shed, we're gonna do what we call an overdig.
That's just gonna be for the gravel base.
So we're gonna go a foot that way, a foot this way, a foot that way and a foot in the back.
That way, we'll have our coverage.
The only other question that we would have is offsets.
Cornetta: Yeah, so we have a 5 foot.
Mark: 5 foot?
Okay.
So this one from the neighbor's yard, that's 5 feet, which is the distance required between a structure and the property line.
And this is actually a great project for a homeowner.
I mean, by the time we get done, you're probably gonna end up saving maybe $1,000.
Cornetta: That's amazing.
I love to hear that.
Mark: Yeah.
And the only other thing is I'm looking at a lot of work.
I think we can handle it.
But if you had an extra set of hands around... Cornetta: Oh, of course I do.
My husband is here, who can help.
And I might actually just sit on the back porch and sip lemonade and watch you all work.
Mark: Okay.
Well, I can't blame you for that, but it is a lot of work, so why don't we get at it?
-Cornetta: Sounds good.
-Mark: Alright, let's go.
Cornetta: So this is my husband, Brent.
-Mark: Brent?
That's our guy.
-Brent: Hey.
-Mark: Alright.
-Brent: Good to meet you.
Mark: You too.
So why don't we choose our weapons?
Brent: Okay.
Mark: Um, I know we're gonna need spade shovels.
-Brent: Okay.
Spade.
-Mark: So let's get that.
Nice iron rake over there.
So let's grab that.
-Brent: Yep.
Mark: And, uh, and let's get in the hole.
Brent: Awesome.
Mark: Alright, so as you guys can see, when they took the concrete out, they took us down to almost a level that we're looking for.
Cornetta: Happy accident.
Mark: Happy accident.
Exactly.
So the number that we're looking for is about 4 to 6 inches.
You can see we already have that here or at least the 4.
And what do you have over there, Brent?
Oh, boy.
-Brent: What's that there?
Mark: Okay.
That's a little bit of concrete, but no big deal.
-Brent: Okay.
Mark: We'll take that with us.
Um, you can get going on that.
-Brent: Okay.
Mark: Cornetta, you can start digging.
I'm gonna go grab a sledgehammer for that.
-Cornetta: Okay.
-Mark: And, uh, we'll figure out where we're gonna dump it after.
-Brent: Alright.
Sounds good.
Cornetta: I'll grab the wheelbarrow.
♪♪ ♪♪ -Mark: Oh, yeah.
-Brent: Yeah.
There you go.
Mark: Little pieces now.
Brent: It's a good team we got right here.
Mark: Yeah!
♪♪ ♪♪ ♪♪ ♪♪ The next step we're gonna do is put fabric paper down.
The reason for that is because we want a barrier between the soil and the gravel.
It's gonna help with weed control.
And it's also gonna help us when we're done just tighten everything up.
So looking good.
The next step is to get our frame and put that in place.
Brent: Alright.
All four of these the same size?
Mark: They're not.
So don't forget we made it a little bit longer than the shed.
So you guys have the 9-footer that wants to go exactly like that.
-Brent: Down.
-Mark: Down.
The short one is the 7-footer.
That's gonna go right along this edge.
Yep.
Just like that.
And that... We'll drop this one right there.
Brent: So, Mark, what's the frame for?
Mark: So the frame is actually the meat and potatoes of our base.
We're gonna put this thing together.
We're gonna make sure it's square because they are putting the shed on top of it.
Now we leveled it.
You can look at that, Brent.
-Brent: Yep, we're level.
-Mark: Nice, level.
And now it's time to add the gravel.
♪♪ ♪♪ This is your edge.
-Brent: Yep.
-Mark: That's my edge.
-Brent: Oh, okay.
Mark: And then we shimmy.
Brent: Put a little weight on it?
Mark: Yep.
Put a little weight.
See what we're doing?
-Brent: Yep.
-Mark: See what we're leaving?
Brent: Yep, I see it now.
Mark: Yep.
There you go.
Just like that.
Okay.
Yep.
Go ahead with that.
♪♪ So we're nice and packed.
-Brent: Yep.
Mark: I might even use some water when we're done here.
Brent: Okay.
Now, adding water to it, what's the purpose?
Mark: It's just gonna help the compaction.
We're gonna hit it one more time and you'll see it sink down a little bit.
Brent: Okay.
Mark: And then we're gonna do a fine rake on it.
Cornetta: Wow, this is amazing.
We started off with nothing and now we have a whole base.
Mark: Okay, so the hard work is done for us, but I just heard the shed truck pull up, so we're gonna watch them do the hard work now.
-Cornetta: There we go.
-Brent: Alright.
-Mark: Alright, let's go.
-Brent: Alright, let's go.
Mark: Now it's time to assemble the shed.
First, the steel base for the floor is placed.
This kit comes with prefabricated sides.
Then it's just adding the roof and front door and it's ready to go.
Alright.
Well, what do you think?
Brent: Wow.
It's so tall.
Mark: Yeah.
Yeah, it was a quick day.
-Brent: Yeah.
-Mark: Quick day.
Everything, luckily, went as planned.
So, Cornetta, she shed?
Cornetta: She shed.
All day.
You thought this was for storage.
-Brent: It is.
-Cornetta: No, no, no.
It's my she shed.
-Brent: Okay.
Alright.
Mark: Well, I do have a little bit of homework for you guys.
So maybe just mulch the area around the shed.
That ought to dress it up enough.
Brent: Yeah.
Mark: And other than that, start loading it up.
Cornetta: Mark, you've been an incredible help.
Mark: Okay.
Cornetta: So thank you so much for being with us today.
And we just really enjoyed working with you.
Mark: Okay.
My pleasure.
And thank you for saying so.
But it was a great project for me, too.
So I had a lot of fun.
-Brent: Coach of the year.
Mark: Yeah.
Alright.
Thank you.
See you later.
-Cornetta: See you later.
♪♪ ♪♪ -Kevin: Hey, Nathan.
-Nathan: Hey, Kevin.
-Kevin: Hey, Tommy.
-Tom: Hey, Kevin.
How are you?
Kevin: I'm doing alright.
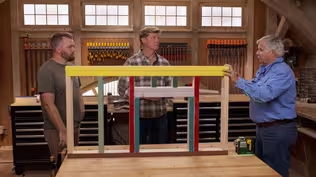
Look at this, a mock-up.
Love it.
What are we talking about today?
Nathan: I got a job coming up.
Homeowner wants to put in a bifold-door kit, but there isn't a wall to receive it.
So first thing is, we need to frame a wall.
Kevin: So we're talking an interior wall?
Nathan: Interior wall.
Non load bearing.
Just a simple partition wall.
Kevin: Alright.
So if we're tackling a wall project, Tommy, where do you like to start?
Tom: First thing you got to do is do a layout.
You got to figure out where the wall is gonna go.
And you want to make sure you make it straight and parallel with other walls.
-Kevin: Mm-hmm.
Tom: So the easiest thing to use, in most cases, is a laser like this.
It's gonna give you a straight line across the floor, up the walls and across the ceiling.
Kevin: You follow that line and you're gonna be straight, you're gonna be plumb.
Tom: It's important that it's plumb and it's important that it's straight.
Kevin: If I'm doing a small project, I don't want to invest in one of those, Tommy, second-best option for layout?
Tom: You could use a chalk line.
Chalk line is easy.
It's a little -- little machine that you use.
You load it with chalk and you snap a line.
-Kevin: Beautiful.
-Tom: The problem is, when you're doing an interior project that maybe has a carpet or whatever, you don't want to snap a red or a blue chalk line on those two because you can't clean it off.
-Kevin: So you recommend what?
-Tom: White.
-Kevin: White chalk.
-Tom: White wipes right off.
Kevin: Cool.
Alright.
Layout.
How about the anatomy of a wall?
What do we need to know just to build any basic wall?
Nathan: So layout's done.
Now we're actually gonna frame.
I'm gonna look at my bottom plate, my top plate.
In this case, we have a double top plate.
But I'll probably do a single one.
And what these are gonna do is land on the floor and the ceiling.
And all of our studs are gonna run from the bottom all the way to the top.
Kevin: And you're saying that you might do a single because non load bearing?
-Nathan: Non load bearing.
I don't have to double up.
Kevin: Just the doors holding the drywall and stuff like that.
Nathan: Exactly.
And then once everything's framed, I'll cut this bottom plate out, create my rough opening.
Kevin: Perfectly okay to cut that one out?
-Nathan: Yep.
-Kevin: Yeah.
Tom: The nice thing about cutting that out afterwards, when you run that straight through the wall, it lines up the wall to make sure everything is parallel with one another.
That's key.
Kevin: That's the horizontal members.
What about the verticals, Tommy?
Tom: These are your studs that run down.
And there's -- usually 16 on center.
Kevin: Okay.
Tom: The ones that define the opening right here, the outside ones, you notice they're the same as the conventional stud.
-Kevin: Meaning they run all the way from the sole plate to the top plate.
Tom: Right.
And this is called a king stud.
Kevin: Yeah.
-Tom: So this is controlling the opening that everything goes to.
So now underneath the header -- This is not a load-bearing header.
This is just a header.
And this is a jack stud.
So it goes from up to down.
It basically is a filler stud that gives you something to fasten your trim to.
But also something for your head is to rest on.
Kevin: Right.
So the jack's always adjacent to the king, always a little shorter.
-Tom: Right.
And that's the height of the door that's gonna go in.
And you want to make sure you subtract the thickness of that.
Kevin: Okay.
And the little guys?
Tom: The little guys are called cripples.
And like I say there's 16 on centers that you space in and it gives you nailers for your wallboard and stuff like that.
Kevin: So interior wall, non load bearing, do we have to do it 16 inches on center or could we mix it up?
Nathan: No, you can mix it up.
You could do 2 foot on center.
But in this case, I'm gonna do 16 on center.
It'll carry the drywall well.
Also you can add insulation later if you wanted to.
It's set up for it.
Kevin: And if we went 24 inches on center, how do you feel about that?
Tom: Well, you can go 24 inches on center.
But now you have to think about the wallboard, all your finishes that you're using.
Because if you go 24 on center, you now have to take that half-inch wallboard and use a thicker wallboard, 5/8, or you measure down from the ceiling, let's say 48 inches, because that's the width of a four 4x8 sheet.
That 48 inches.
And then put it on center.
You put a block at the joints to lessen that happening, or you kick up the thickness of the wallboard so that it doesn't bend to 5/8.
Kevin: Okay, so a couple options, but if you understand the basics of an interior wall, which we have right there, pretty much anyone can do it.
You guys think it's a good homeowner project?
Nathan: I think it's an easy frame.
Yeah, definitely a good project.
-Tom: It's a great project.
Kevin: Good.
Alright.
Well, good luck with yours.
-Nathan: Alright.
Thank you.
-Kevin: Thank you.
This is awesome.
Nathan: Hi, Jack.
Jack: Hey, Nathan.
It's good to see you.
Nathan: Nice to meet you.
So you wrote me about a mudroom issue.
Jack: I do.
I have something to cover up.
Nathan: Alright.
Let's take a look.
Thank you.
Alright.
So I recognize this space from the e-mails.
Jack: This is the eyesore.
Yeah.
It's the first thing my guests see when they walk in the door, and I just hate it.
-Nathan: Yeah.
No, I'm with you.
I can definitely see closing this off.
Nice clean entryway.
Um, I think a bifold-door kit would work well here.
We got to frame a wall to receive it, but I pick up -- I picked up a really nice bifold-door kit.
It's a 6-panel hollow core, really common in new builds these days.
-Jack: Awesome.
-Nathan: Easy to install.
Um, so let's get some tools and get started.
Jack: Great.
Nathan: First thing I would do is actually we're gonna cover this up.
For the course of the project, we'll protect it.
Yeah.
Alright.
So we're gonna start with a layout.
I set the laser up.
Alright.
So now we have a line projected around the room 360 degrees.
We're equal equal off the wall.
So we know this is where we're gonna frame up our new wall.
I'm just gonna go around.
I'm gonna make some reference marks that'll stay there.
And we'll frame two of those marks.
So we got a little piece of baseboard that we want to take out here where our wall is gonna go.
So we have that little piece of baseboard cut out.
We're ready to cut our top and our bottom plate.
So we have our bottom plate and our top plate measurement.
Now that we have a bottom plate down, let's start working on our layout.
We know that we're gonna have a full-height stud here on the right-hand side.
Then we're gonna come out another inch and a half to 3 inches.
That's gonna be our jack stud.
Now, off of that jack stud... to create a rough opening to receive the door, we're gonna go 62 inches.
So take my pencil there.
I'm gonna string out 62 inches.
If you want to make a mark right there... Alright.
So that is gonna be where our jack stud on the left-hand side is.
-Jack: Great.
Nathan: So we'll make a mark here.
We'll measure over an inch and a half and 3 inches.
So we'll come over... We'll come over inch and a half and 3 inches.
There.
There.
Stud.
Alright.
So that's gonna be about the size of our door opening.
Jack: Great.
Nathan: Next step is we can throw a few screws right here because later we're gonna cut this bottom plate out.
And I have the -- uh, I have that mark there about a half inch back.
That one's good.
Let's screw that off.
We want to make sure this is plumb.
We're hitting our marks.
We'll do sets of screws going up the side.
And then we'll do a few across the top.
Alright, so we have our left and our right stud in.
We can put this stud in.
And we can also add our jack stud after that.
-Jack: Great.
-Nathan: Push it over.
We'll catch the bottom and then we'll plumb it up.
Make sure that's nice... nice and tight.
So what do you think?
Out or... Jack: A little bit in.
Nathan: Right on.
-Jack: Yeah.
Nathan: Put our jack studs in.
So what we're gonna do is screw these together.
Once that's assembled, we'll put our header across the top.
Alright.
So we've got our header in.
We've just got to screw it off.
I'm gonna cut some cripple studs for the top.
So if you want to screw this in, then we're ready for drywall.
Jack: Awesome.
It's already looking like a door.
Nathan: It's looking a lot better.
♪♪ ♪♪ Alright, now that we have our drywall pieces cut, we can screw them on.
♪♪ ♪♪ So we don't have a really large, flat space to assemble this jam that came with a kit.
So we're gonna do our best to assemble it standing up, which is a little bit more difficult.
But if you want to bring your piece over, get a little glue in this joint.
Gonna glue it, nail it, and then we'll set it into place.
♪♪ ♪♪ And go towards you a little bit and put it inside the opening.
So... Alright.
Now the goal is to keep this equal equal with the drywall.
So we're gonna switch places.
You come over here and pin this and just hold that real tight.
Jack: Sure.
Nathan: I'm gonna grab some shims.
What we're gonna do is try and plumb it, level it all at once.
-Jack: It looks nice.
-Nathan: Looks good?
-Jack: Yeah.
Nathan: Alright.
Pull the level.
♪♪ ♪♪ ♪♪ ♪♪ Ready to start trimming this door.
You like it right there?
♪♪ ♪♪ Alright.
So we're ready to put our track in.
It's gonna get mounted up across the top like this.
So if you want to hold the whole track, I'm gonna grab the screws.
-Jack: Yeah.
♪♪ ♪♪ Nathan: Now we are ready to put the floor brackets on.
♪♪ Alright.
So we have our track in.
We're ready to start setting our doors up.
We're gonna start by setting our left doors up.
Um, really important to look back at them.
Okay.
We have the top.
We have the bottom.
We have our lead door.
We have our pivot door.
Um, we'll start putting the parts and pieces in.
At the bottom we have our bottom pivot pin.
This is gonna go on the bottom.
This is how we adjust the height of the door.
At the top, top pivot pin.
And over here we have our track guide, which is gonna spring up into place.
So let's start by putting the pins in.
-Jack: Sure.
-Nathan: You're gonna put it in.
Find that mortise hole right there.
Drive that up until it gets to that plastic collar.
Alright.
This door is all set.
Let's bring it in.
Jack: Alright.
Nathan: So the easiest way is to lift up in the center.
Fold it.
And then if you want to grab the door, I'll carry it in.
-Jack: Sure.
-Nathan: Nice.
Alright.
Let's work together to get this door into place.
We'll get it close.
I'm gonna lean it to you.
Let me get the bottom in.
Alright.
Jack: And that's locked in.
Nathan: Alright.
Jack: Nice.
Nathan: Alright, so we have a little piece of trim that we're gonna put around the opening.
I did a little bit of a reveal off the front, about one inch.
So if you want to go down and grab that side, hold it on that 1-inch mark.
Middle.
Alright.
Now we're gonna put our knobs on.
So I'm gonna find the center here in the style.
And then I'm gonna find the center of the panel.
I don't want to find the center of this individual door because that would put us over here.
So I'd like to be centered under that panel for a good look.
So what is half of 9 inches?
-Jack: 4 1/2.
-Nathan: 4 1/2.
Okay.
What is half of 6 3/4?
3 3/8.
Alright.
So that's our layout.
Here's the drill.
Toss your glasses on there.
I'll go lay out this side.
Alright.
Final step.
We're gonna put our aligners on.
These are gonna be mounted to the backside of the lead door.
I'm gonna measure up a foot from the ground up to the backside.
Strike a line at a foot and go up an eighth on one side and down an eighth on the other.
When they shut and align, it'll keep the door from flopping.
Alright, let's give it the test.
Door's open.
Washer dryer.
-Jack: Beautiful.
-Nathan: Close the doors.
Everything's hidden from your guests.
Jack: I love it.
Nathan: I think you are good to go.
Little bit of homework though.
Alright.
Two more coats of joint compound.
Sand it, prime it, paint it.
All the trim and the doors have a coat of primer on them, but they will need a couple of coats of paint.
Jack: Okay.
Nathan: Finish that up and you'll be good to go.
-Jack: Doable.
-Nathan: Alright.
-Jack: Thank you so much.
-Nathan: Good luck.
Jack: Appreciate it.
♪♪ ♪♪ Kevin: Next time on "Ask This Old House," Richard helps a homeowner convert their wood-burning fireplace to gas.
Richard: Thank you!
Kevin: Then it's spring-loaded with two different metal tips.
What is it?
And Nathan gives a dining room a facelift by installing wainscoting.
Nathan: What is half of 37 3/16?
Man: 18 5/8?
Nathan: You are correct.
Kevin: All that on "Ask This Old House."


Support for PBS provided by:
Funding for THIS OLD HOUSE is provided by The Home Depot.